

How To Clean A Clogged Lawn Mower Carburetor
How to Repair Modest Engines: Cleaning the Carburetor
Don't Google "small engine repair near me" the next time your lawnmower sputters. Larn how to do it yourself. Pocket-sized engine repair is all almost a clean carburetor.
![]() Fourth dimension
Fourth dimension
A full day
![]() Complexity
Complexity
Intermediate
![]() Toll
Toll
$51–100
Introduction
Solve most lawnmower or other small-scale engine starting problems with a simple diagnosis and a carburetor cleaning or rebuilding. It will just take a few hours, and you'll avoid the minimum $seventy-plus-parts repair neb.
Tools Required
Materials Required
- Carburetor cleaner
- Carburetor rebuild kit
- Plastic gloves
- Strong wire
If you can't become a pocket-size engine started, it takes too many pulls to get it going, or it runs poorly, ask yourself this: Did information technology sit for a long fourth dimension with gas in it? Like over the winter? If and then, your problem is near probable a corroded or gummed-up carburetor. Small engine repair shops earn near 50 percent of their revenue by cleaning or replacing carburetors sidelined by quondam gas. Wait at your lawnmower carburetor next time you sharpen the blades or complete a lawn mower tune-upward.
Earlier y'all start taking things apart, take a infinitesimal to confirm the carburetor is the problem. We'll show you how to practice that, as well as how to clean, rebuild or replace a lawnmower carburetor. Either mode, you lot'll salvage about an hour of store labor (most $70). You tin consummate the carburetor rebuild projection in a unmarried morning, including the time scouting for parts.
Project step-by-step (7)
Footstep 1
Start Your Engine (At To the lowest degree Endeavour)
- Confirm that the fuel valve is on, at that place's gas in the tank and the spark plug is in good shape.
- Shoot a one-second burst of droplets lubricant or carburetor cleaner downwards the throat of the carburetor.
- Yank the cord.
- Note: If the engine runs (even just sputters) and dies, you have a fuel problem. If there's no life after a few tries, it's something more serious and you need to haul the engine to your garage for some detective work.
Step 2
Examination for Gas at the Carburetor
- Clench off the fuel line.
- Compress the spring clench and slide information technology backward on the fuel line.
- Pull the tubing off the carburetor nipple and catch the gas in a small bowl.
- Notation: If no gas comes out of the fuel line, you've got a plugged fuel line or fuel filter.

![]()
Step iii
Remove the Carburetor
- Use a socket or nut driver to remove the two bolts that hold the carburetor to the engine.
- Unhook the throttle cable from the carburetor linkage.
- Place the carburetor in a container (to catch the gas).

Step 4
Check for Corrosion
- Open up the carburetor bowl to check for corrosion.
- Note: If the inside of the carburetor is corroded, it needs to exist replaced. Even later on cleaning, the corrosion will clog the jets and tiny orifices and restrict the period of gas.

Rebuild or Supplant?
If at that place's no corrosion in the carburetor, you can choose to rebuild it rather than replace it. But rebuilding isn't always cheaper, and information technology might non even do the trick. Sometimes you can buy a new carburetor for less than (or pretty darn close to) the toll of the rebuilding kit plus the price of the chemicals. We e'er merely supersede bad carburetors rather than rebuild them.
If y'all opt to rebuild, follow the steps below:
Footstep v
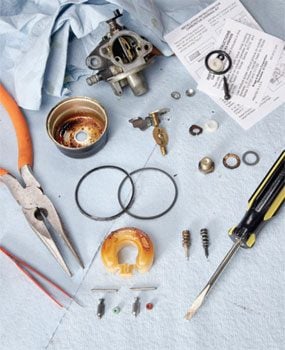
Dissect the Carburetor on Your Workbench
- Start the disassembly from the bottom (basin, float, needle, seat, etc.) and continue all the parts together.
- Pro tip: Shoot digital photos for help during reassembly.
- Match the new gaskets and O-rings in the carburetor repair kit to the quondam ones.
- Set aside the used gaskets and O-rings you lot'll discard, and any parts from the kit you don't need.
Step 6
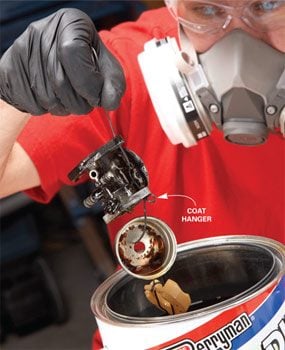
Clean the Parts
- Wire all the larger parts together and drop them into a bucket of carburetor cleaner.
- Wrap the modest parts in a piece of aluminum screen or use a fine-mesh handbasket, and drop them in the saucepan as well.
- Notation: New/replacement parts don't need to be cleaned.
- Allow the parts soak for one hour.
Stride 7
Reassemble the Carburetor
- Rinse all the parts with water and accident them dry with compressed air.
- Reassemble the old and new carburetor parts and mount it on the engine.
- Follow the instructions in the kit for adjusting the idle speed and mixture.
- Burn up your engine and listen to it purr!
How to Discover Carburetor Parts and Prices
Whether you buy parts from a local pocket-size engine repair shop or online, you may need all this data:
- Automobile brand (Toro, Snapper, Honda, etc.), model and serial number.
- Engine brand and serial number (Tecumseh, Briggs & Stratton, Honda, etc.). The engine model and serial number are commonly located on a plate above the spark plug.
- You may likewise need numbers from the quondam carburetor itself, commonly stamped onto the carb body or its mounting flange.
- You lot can buy locally, or try smallenginepartswarehouse.com or psep.biz.

Source: https://www.familyhandyman.com/project/how-to-repair-small-engines-cleaning-the-carburetor/
Posted by: southgroled88.blogspot.com
0 Response to "How To Clean A Clogged Lawn Mower Carburetor"
Post a Comment